Modding

Ara Modding Setup Guide
This document will show you how to get started with modding Ara: History Untold.
In this initial version of mod support, we provide a copy of our source game data files in the Ara installation directory. You can install these source files as a mod in your Documents folder and enable mod loading in the Ara settings. We will walk through each step below.
QuickStart
- Find the game data source files in the Ara installation folder at `assets\SourceMods\.
- Copy the folder SourceMods (files and sub-folders) it into `Documents\My Games\Ara History Untold\Mods\`. Create the "Mods" folder first if it does not exist.
- Navigate to `%LOCALAPPDATA%\Ara History Untold` with File Explorer (open File Explorer with WinKey + E) and open the latest settings text file (e.g. `Settings_V122.txt`).
- Set the line `EnableMods=0` to `EnableMods=1`. If this line is missing, add it to the end of the file.
- Set the line `GameCoreMod0Source=` to `GameCoreMod0Source=YourModName`. If this line is missing, add it to the end of the file.
- Start Ara – it will load your modified source files from your Documents folder into the game. Multiplayer and achievements will be disabled while mods are enabled.
Step 1: Find the game data source mods files
If you own the game through Steam, you can get to your installation files quickly through the Steam Library tab. For Windows Store installations (e.g. from Game Pass), you can find the top-level Ara folder by starting at `%LOCALAPPDATA%\Microsoft\WindowsApps`.
Find Ara in your Steam library
Right-click the game in the library list, select Manage -> Browse Local Files.
You should have a File Explorer window (WinKey + E) open with the following folder:
Open the `assets\SourceMods` folder and copy the whole folder (files and sub-folders).
Step 2: Paste SourceMods into Mods folder
Use File Explorer to open your Documents folder and navigate to `My Games` and then, in a separate window, the `Ara History Untold` folder.
In `Documents\My Games\Ara History Untold`, create a `Mods` folder (if it does not already exist).
Open the Mods folder and select the Paste the whole SourceMods folder into it.
You should end up with a folder SourceMods in the Mods folder, containing all of the game data files.
Step 3: Enable modding in Ara settings
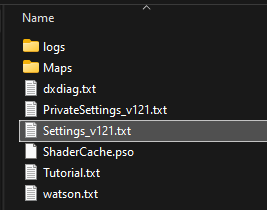
Open a File Explorer window and navigate to `%LOCALAPPDATA%\Ara History Untold`.
This folder contains a settings file, such as `Settings_v121.txt`. Open the one with the largest version number (the "v121" or similar at the end).
You can open this file using a text editor such as Notepad or Visual Studio Code.
In the file, you should find two lines: `EnableMods=0` and `GameCoreMod0Source=`. If you haven't run the game since the last update, you may need to do so for these to show up. Alternatively, you can also add them to the end of the file manually.
Change these lines to: EnableMods=1 GameCoreMod0Source=YourModName
Save and close the file.
Step 4: Run Ara
If you launch Ara again, you should now start with mods enabled and the source files from YourModName loaded as your active game rules.
If there are errors loading the mod files, you will receive a data error popup, and the game will proceed loading only its built-in, un-modded data.
(Note: Pressing 'Ctrl-C' will copy all the text from the error popup)
`%LOCALAPPDATA%\Ara History Untold\logs\Ara.log` contains a diagnostic log of the mods loaded (if any) and errors found.
While you are running with mods enabled, achievements and multiplayer will be disabled.

